5-Node Wall-Mounted Proxmox Cluster
homelabproxmoxnetworkinghardware working
4/1/2026
Tools: Phillips screwdriver, drill, 3D printer, zip ties, Ethernet crimper
Parts: HP EliteDesk G4 Mini — Intel Core i5-8500T (x4), Lenovo ThinkCentre M720Q Tiny (x1), 3D-printed M.2 A+E to 2.5GbE NIC bracket (x5), 3D-printed 2.5-inch SSD caddy for HP EliteDesk (x4), SSD cables for HP caddies (x5), 256 GB NVMe SSD (boot, multiple), 512 GB NVMe SSD (pve apps node), 1 TB NVMe ZFS datastore (pve1 PBS node), TP-Link SG2218 managed switch, TP-Link C64 (configured as AP), MikroTik hEX S 2025
Time spent: ~6 hours
Cost: ~25K PHP for nodes + networking gear
Context
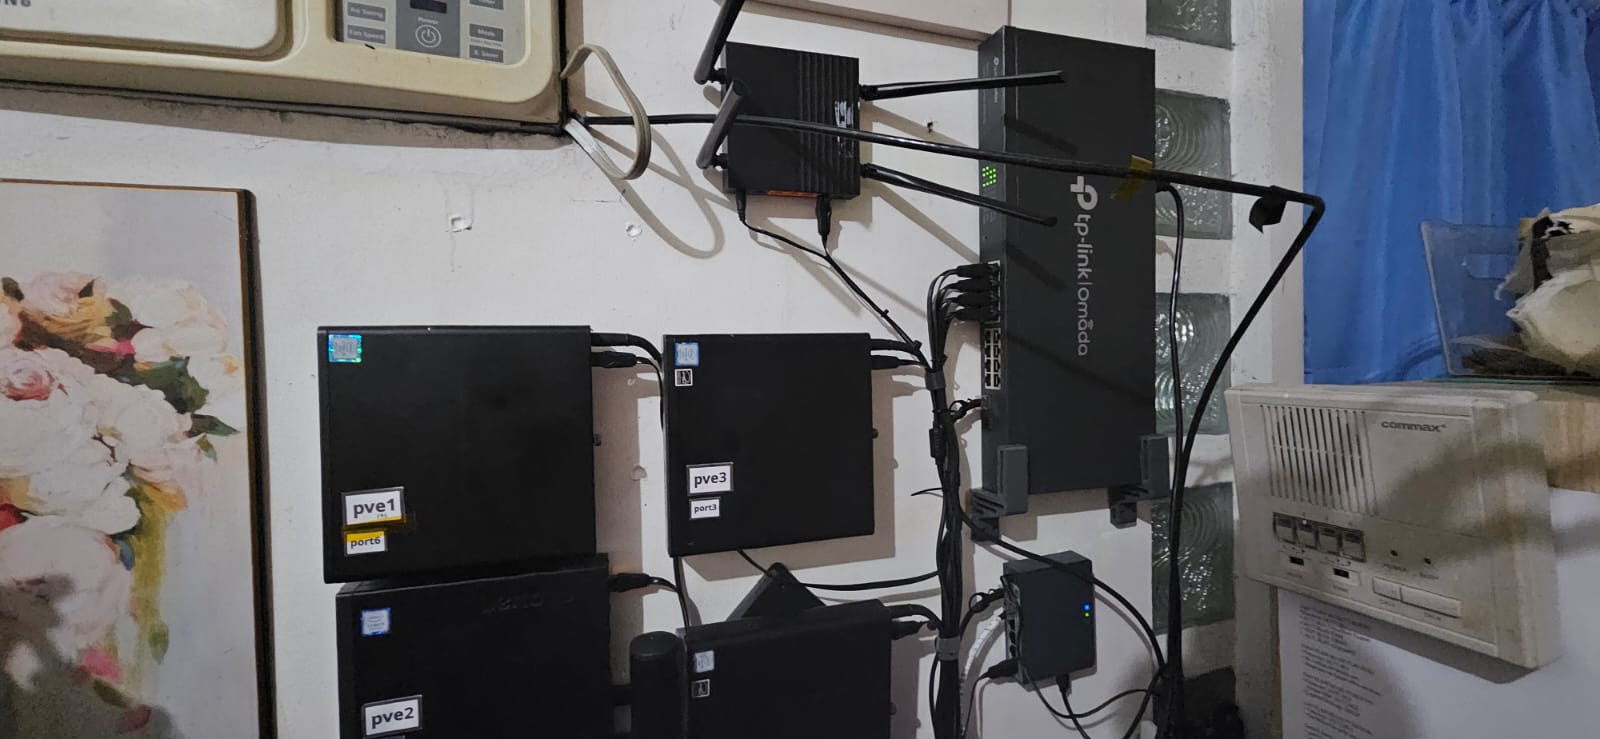
I wanted a compact, always-on virtualization lab for running services locally and learning infrastructure hands-on, without the footprint of a full rack. The idea was to run multiple Proxmox VE nodes on small-form-factor PCs, wall-mount everything to save desk space, and keep the entire stack on a dedicated management VLAN with VLAN-aware bridges for service segmentation.
Plan
- Source five inexpensive mini PCs with built-in 1GbE NICs (used HP EliteDesk G4 Minis and one Lenovo M720Q Tiny)
- Install 3D-printed M.2 A+E to 2.5GbE NIC brackets to prepare for future upgrade
- Install Proxmox VE on each node and assign clear roles (apps, backups, DNS cores, spare)
- Add 3D-printed 2.5-inch SSD caddies to the HP units for extra local storage
- Mount all compute nodes and networking gear directly to the wall
- Connect the cluster through a TP-Link SG2218 managed switch and a MikroTik hEX S 2025 router, with a TP-Link C64 handling wireless access
- Keep management on one VLAN (VLAN1) and tag application traffic to VLAN30
Execution
Phase 1 — Hardware and sourcing
- Bought four HP EliteDesk G4 Mini PCs and one Lenovo M720Q Tiny, most around 5,000 PHP each.
- Sourced 3D-printed wall-mount brackets, M.2 A+E to 2.5GbE NIC brackets, and 2.5-inch SSD caddies from Printables.
- Bought matching SSD cables for the HP caddies.
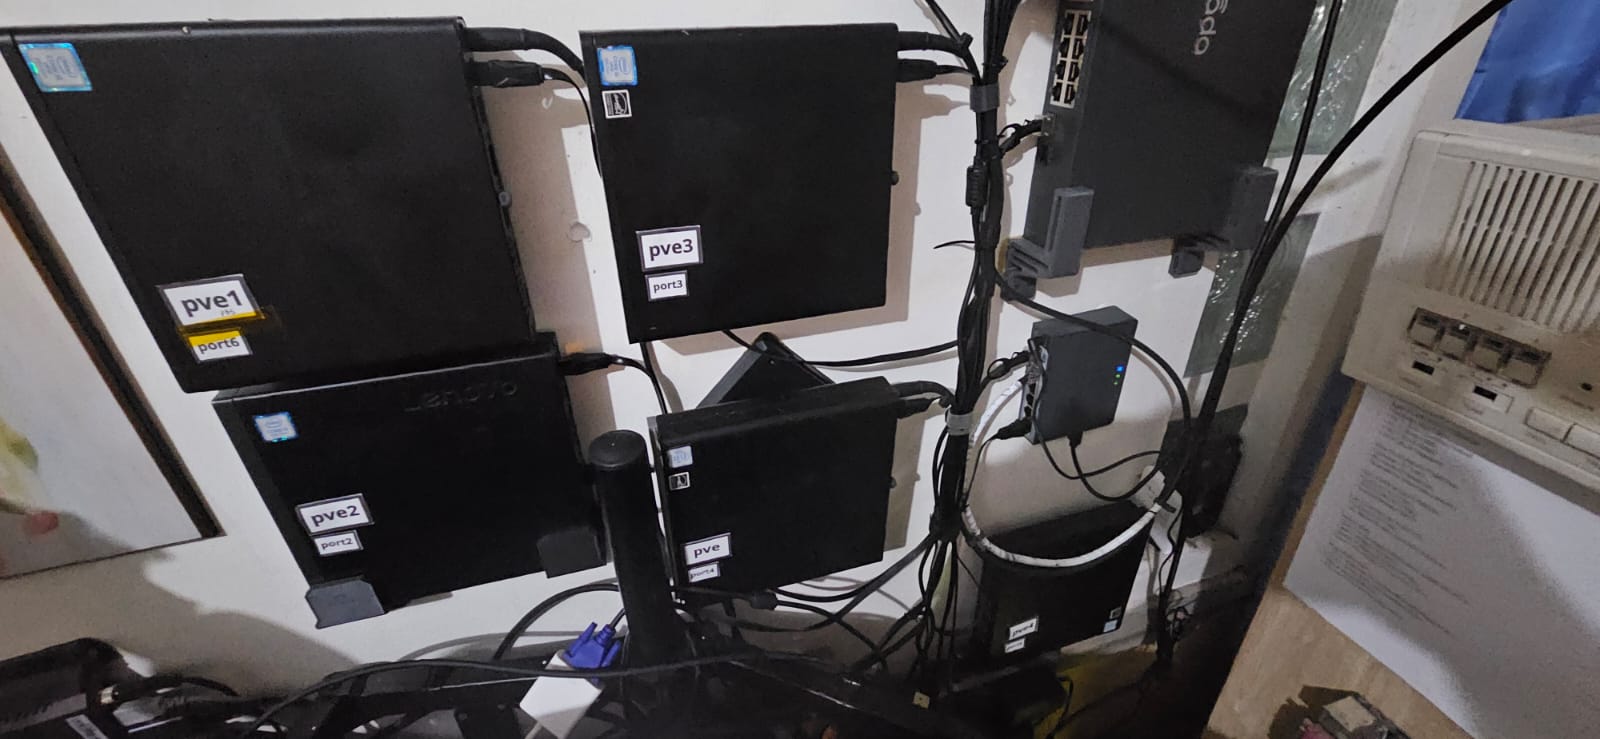
Phase 2 — Node roles and storage
| Node | Role | RAM | Storage |
|---|---|---|---|
| pve | Applications node (cf-tun, copyparty, tailscale, crm1, crm2) | 32 GB | 256 GB + 512 GB NVMe |
| pve1 (pbs1) | Proxmox Backup Server, 1 TB ZFS single-disk NVMe datastore | — | 256 GB SATA SSD boot + 1 TB NVMe |
| pve2 | Core DNS (Technitium DNS) — runs Proxmox VE | 16 GB | 256 GB NVMe |
| pve3 | Core DNS (Technitium DNS) — runs Proxmox VE | 16 GB | 256 GB NVMe |
| pve4 | Idle / future labs & telco test node — runs Proxmox VE | 16 GB | 256 GB NVMe |
Phase 3 — Networking and wall mount
- Mounted all five nodes, the TP-Link SG2218, the MikroTik hEX S 2025, and the TP-Link C64 access point directly to the wall.
- Ran patch cables between nodes and the switch; bundled with zip ties.
- Configured VLAN-aware bridges on each node. Management stays on VLAN10; services like apps are tagged to VLAN30.
- Originally clustered all five nodes under Proxmox VE, but later reverted to standalone since clustering did not match my actual use case.
Result
- All nodes boot and run Proxmox VE reliably.
- Apps on the pve node (cf-tun, copyparty, tailscale, crm1, crm2) are reachable and stable.
- pve1 runs PBS and backs up VMs to its local ZFS datastore.
- pve2 and pve3 run Technitium DNS as redundant core resolvers.
- pve4 is idle and reserved for future labs; planned upgrade to 32 GB RAM and an extra 1 TB SSD.
- Network segmentation via VLAN-aware bridges works as intended.
Lessons
- Used mini PCs are cheap lab compute, but always verify RAM slots and NVMe storage options before buying.
- Clustering is not mandatory; standalone nodes are simpler to manage if you do not need live migration or shared storage.
- Wall mounting saves floor space, but plan cable lengths and power brick placement before drilling. Power bricks are stuck to the wall with Command strips / velcro mounting.
- Two-part wall mounts (wall plate + PC bracket) let you detach nodes easily for maintenance. The HPs slot onto VESA-mounted brackets; the Lenovo M720Q needed a different wall holder since it lacks VESA holes.
- 3D-printed brackets and caddies work well for mini PCs with non-standard mounting points, but PETG is sturdier than PLA for long-term heat exposure.